Tuesday 21 February 2023

What is cisco port security? How to secure switches ports? | What are the violations of port security? | How to configure?

 As we already know switches are very important network devices and with the help of switches we connect and maintain communication channels between various devices. we also know ethernet ports are present on our switches and with these ports, we connect our devices like routers computers, and other devices. switches identify the devices by their MAC addresses and provide the services. the important thing is we need to secure these ethernet ports so that authorized users are able to connect network securely. 


here we can use the security feature of Cisco IOS Port-security to block the ethernet, fast ethernet, or Gig ports when the MAC address is different from the specified MAC on the port. we can use port security to filter traffic that is destined to or received from a specific host that is based on the host MAC address. These security features only be configured on access ports and by default this feature is disabled.  

before we start our lab and come to the direct point, what I always do but before we need to understand these points.


  • Aging 
  • mac-address
  • maximum
  • violation

Aging is when we configure the maximum number of MAC addresses on the particular port, we can also configure aging with the help of aging we specify how long the address on the port is secure,


 once the time is expired, the MAC address on that port will be insecure, by default all addresses on a port are secured permanently. <1-1440> Aging time in minutes. Enter a value between 1 and 1440.


MAC address_ when we configure the specific MAC address in the port security command, only that device will be authorized by the switch to connect through the available port. this is also called a static mac address.  


from the above output, we can see after the? mark. now have (H.H.H means configure static MAC address) and the second mode is (sticky) let's take a look at sticky.


Sticky before we understand what is sticky mode first, we must know, we have two configuration options for example 

Switch(config-if)#switchport port-security mac-address sticky 0000.0C39.6AEC
                                                            {AND}

Switch(config-if)#switchport port-security mac-address sticky


whenever we enable sticky learning on an interface, the interface converts all the dynamic secure MAC addresses, and also those that were dynamically learned before sticky learning was enabled, to sticky secure MAC addresses and adds all sticky secure MAC addresses to the running configuration. all newly on-boarded clients are considered sticky MACs.


now we know that the switch can learn MAC addresses on a secure port in one of three ways. 

1. Manually the admin can manually configure a static MAC address. using the command

switchport port-security mac-address 0000.0C39.6AEC

2. Dynamically when we configure the command switchport port-security, whatever the current source MAC address on that port device will be secured but not added in running-config.  if we reboot the switch the port has to re-learn the MAC address. 

switchport port-security 

3. Dynamically-Sticky the admin can enable the switch to learn MAC address dynamically and stick them in running-config. 

switchport port-security mac-address sticky 


Maximum as per our requirements we can increase the limit of the number of hosts which is associated with the interface. by default, only 1 MAC address is allowed by the cisco switch on a single port. if other devices try to connect using this port our switch shutdown the port automatically. we can set this limit from 1 to 132. the maximum number is 132.  


Now we have the last mode violation


Violation_
when the MAC address of a connected device to a port is different from the list of secure addresses we are given on the interface, then a port violation occurs and the port enters the error-disable state. In violation, we have three modes. as you can see in the picture below.


Protect_ under the Protect mode the data packets from the configured MAC addresses are only transferred within the network. this mode is the least secure of the security violation mode. the port dropped the packets with unknown MAC addresses until you remove a sufficient number of MAC addresses. no syslog message is sent.   


Restrict_ under the restrict mode if the security violation occurs, all the data transfer is blocked and packets are dropped. also, Syslog messages are generated simultaneously, 


Shutdown_ under the shutdown mode if the violation occurs on port security enable the port. the port changed to an error-disable state. this mode is enabled by default. 


{if you like this post, please take a look at our YouTube program}

https://youtu.be/D0t29ZdO09I


Wednesday 1 February 2023

What is PVST PVST+ and RPVST+ Spanning tree? How to configure PVST?


Per VLAN Spanning tree (PVST) is cisco's proprietary version of STP which delivers more flexibility than the common spanning tree version. PVST works on a separate instance of STP for each VLAN. In normal STP, CST (Common Spanning Tree), only one instance can be used for the network. There are no specific instances per VLAN. This allows the STP on each VLAN to be configured independently and offers better load balancing and tuning according to the conditions. 

but as we know PVST is a cisco proprietary and because of its proprietary nature, Per VLAN Spanning tree (PVST) requires the use of a cisco inter-switch link (ISL) trunk but in coexist network where CST is working, and we configure PVST there will be problem occurs both require different trunking methods and the problem remains BPDUs are never exchanged between these types of STP. 

the solution is Per-VLAN spanning tree plus (PVST+) it's also the cisco proprietary version of STP and allows the device to interoperate with both PVST and CST. PVST+ act as a translator between a group of CST switches and groups of PVST switches. PVST+ creates an instance for each VLAN and in each instance, a different STP process occurs, a different Root bridge is selected, different port roles are used, etc.


Rapid Per VLAN Spanning Tree Plus (RPVST+) it's a Cisco proprietary STP version. Again, it has an instance for each VLAN and each VLAN has a separate STP process just like PVST but RPVST+ has a faster convergence advantage if we compare it with PVST+.


Let's see the configuration for a better understanding:

Topology:


Goal:

  • configure the topology as per the diagram.
  • configure VLANs 10,20,30 and 40 on all the switches.
  • configure TRUNK between switches 
  • Allowed all VLANs on all the switches
  • configure PVST on all switches 
  • configure Root bridge on switch 1 for VLAN 10
  • configure Root bridge on switch 2 for VLAN 20 
  • configure Root bridge on switch 3 for VLAN 30
  • configure Root bridge on switch 4 for VLAN 40 
  • verify the configuration 


SWITCH-1(config-vlan)#VLAN 10

SWITCH-1(config-vlan)#VLAN 20

SWITCH-1(config-vlan)#VLAN 30

SWITCH-1(config-vlan)#VLAN 40 


SWITCH-2(config)#VLAN 10

SWITCH-2(config-vlan)#VLAN 20 

SWITCH-2(config-vlan)#VLAN 30

SWITCH-2(config-vlan)#VLAN 40


SWITCH-3(config)#VLAN 10

SWITCH-3(config-vlan)#VLAN 20 

SWITCH-3(config-vlan)#VLAN 30

SWITCH-3(config-vlan)#VLAN 40


SWITCH-4(config)#VLAN 10

SWITCH-4(config-vlan)#VLAN 20 

SWITCH-4(config-vlan)#VLAN 30

SWITCH-4(config-vlan)#VLAN 40


SWITCH-1(config)#interface range fastEthernet 0/1-2
SWITCH-1(config-if-range)#switchport mode trunk
SWITCH-1(config-if-range)#exit

%LINEPROTO-5-UPDOWN: Line protocol on Interface FastEthernet0/1, changed state to down
%LINEPROTO-5-UPDOWN: Line protocol on Interface FastEthernet0/1, changed state to up

SWITCH-2(config)#interface range fastEthernet 0/1-2
SWITCH-2(config-if-range)#switchport mode trunk

%LINEPROTO-5-UPDOWN: Line protocol on Interface FastEthernet0/2, changed state to down
%LINEPROTO-5-UPDOWN: Line protocol on Interface FastEthernet0/2, changed state to up


SWITCH-3(config)#interface range fastEthernet 0/1-2
SWITCH-3(config-if-range)#switchport mode trunk

%LINEPROTO-5-UPDOWN: Line protocol on Interface FastEthernet0/1, changed state to down
%LINEPROTO-5-UPDOWN: Line protocol on Interface FastEthernet0/1, changed state to up

SWITCH-4(config)#interface range fastEthernet 0/1-2
SWITCH-4(config-if-range)#switchport mode trunk

%LINEPROTO-5-UPDOWN: Line protocol on Interface FastEthernet0/1, changed state to down
%LINEPROTO-5-UPDOWN: Line protocol on Interface FastEthernet0/1, changed state to up

SWITCH-1(config)#interface range fastEthernet 0/1-2
SWITCH-1(config-if-range)#switchport trunk allowed vlan 1-40 
SWITCH-1(config-if-range)#exit


SWITCH-2(config)#interface range fastEthernet 0/1-2
SWITCH-2(config-if-range)#switchport trunk allowed vlan 1-40 
SWITCH-2(config-if-range)#exit

SWITCH-3(config)#interface range fastEthernet 0/1-2
SWITCH-3(config-if-range)#switchport trunk allowed vlan 1-40 
SWITCH-3(config-if-range)#exit


SWITCH-4(config)#interface range fastEthernet 0/1-2
SWITCH-4(config-if-range)#switchport trunk allowed vlan 1-40 
SWITCH-4(config-if-range)#exit

SWITCH-1(config)#spanning-tree ?
  mode      Spanning tree operating mode
  portfast  Spanning tree portfast options
  vlan      VLAN Switch Spanning Tree

SWITCH-1(config)#spanning-tree  mode ?
  pvst        Per-Vlan spanning tree mode
  rapid-pvst  Per-Vlan rapid spanning tree mode


SWITCH-1(config)#spanning-tree  mode pvst

SWITCH-2(config)#spanning-tree mode pvst

SWITCH-3(config)#spanning-tree mode pvst

SWITCH-4(config)#spanning-tree mode pvst


SWITCH-1(config)#spanning-tree vlan 10 root primary 

SWITCH 1 VLAN 10


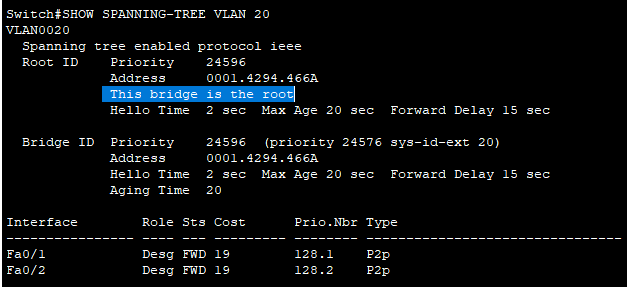
SWITCH-2(config)#spanning-tree vlan 20 root primary


SWITCH 2 VLAN 20


SWITCH-3(config)#spanning-tree vlan 30 root primary 

SWITCH 3 VLAN 30


SWITCH-4(config)#spanning-tree vlan 40 root primary 

SWITCH 4 VLAN 40


Friday 20 January 2023

How to configure Static MAC Address table Entries?

 By default, our switch dynamically learns the MAC address and stores it in the CAM table. by just looking at the source MAC address of the incoming frame. 


This dynamically learning the MAC addresses and filling in the CAM table the process is vulnerable to layer 2 MAC address spoofing attacks. The attacker easily spoofs a few MAC addresses to change entries in the MAC address table. We can deal with this problem by manually configuring entries in the MAC address table. A statically configured MAC address will always overrule dynamic entry. 


Let's configure the Static MAC Address table Entries: -

Topology:


Goal: -

  • configure the topology as per the diagram.
  • configure the IP addresses as per the topology
  • configure IP addresses on the PC as per the topology 
  • ping from PC 1 to all the PCs 
  • configure STATIC MAC addresses

Router(config)#interface gigabitEthernet 0/0
Router(config-if)#ip address 192.168.1.1 255.255.255.0
Router(config-if)#no shutdown 
Router(config-if)#exit


%LINK-5-CHANGED: Interface GigabitEthernet0/0, changed state to up
%LINEPROTO-5-UPDOWN: Line protocol on Interface GigabitEthernet0/0, changed state to up


Switch(config)#interface vlan 1

Switch(config-if)#ip address 192.168.1.2 255.255.255.0

Switch(config-if)#no shutdown

Switch(config-if)#exit


C:\>ping 192.168.1.4


Pinging 192.168.1.4 with 32 bytes of data:


Reply from 192.168.1.4: bytes=32 time<1ms TTL=128

Reply from 192.168.1.4: bytes=32 time<1ms TTL=128

Reply from 192.168.1.4: bytes=32 time=1ms TTL=128

Reply from 192.168.1.4: bytes=32 time<1ms TTL=128


Ping statistics for 192.168.1.4:

Packets: Sent = 4, Received = 4, Lost = 0 (0% loss),

Approximate round trip times in milli-seconds:

Minimum = 0ms, Maximum = 1ms, Average = 0ms


C:\>ping 192.168.1.5


Pinging 192.168.1.5 with 32 bytes of data:


Reply from 192.168.1.5: bytes=32 time=1ms TTL=128

Reply from 192.168.1.5: bytes=32 time<1ms TTL=128

Reply from 192.168.1.5: bytes=32 time=1ms TTL=128

Reply from 192.168.1.5: bytes=32 time<1ms TTL=128


Ping statistics for 192.168.1.5:

Packets: Sent = 4, Received = 4, Lost = 0 (0% loss),

Approximate round trip times in milli-seconds:

Minimum = 0ms, Maximum = 1ms, Average = 0ms


C:\>ping 192.168.1.6

C:\>ping 192.168.1.7

C:\>ping 192.168.1.8

C:\>ping 192.168.1.9

C:\>ping 192.168.1.10

C:\>ping 192.168.1.11


Router#ping 192.168.1.2


Type escape sequence to abort.

Sending 5, 100-byte ICMP Echos to 192.168.1.2, timeout is 2 seconds:

!!!!!

Success rate is 100 percent (5/5), round-trip min/avg/max = 0/0/4 ms


Switch#show mac address-table

Mac Address Table

-------------------------------------------


Vlan Mac Address Type Ports

---- ----------- -------- -----


1 0001.c92e.016d DYNAMIC Fa0/9

1 0004.9a7b.331d DYNAMIC Fa0/2

1 000a.418d.0b8b DYNAMIC Fa0/4

1 000d.bd40.3c82 DYNAMIC Fa0/10

1 0010.1141.3d28 DYNAMIC Fa0/6

1 0030.f2d1.9701 DYNAMIC Fa0/1

1 0050.0f64.a758 DYNAMIC Fa0/7

1 0060.3e6e.6dd5 DYNAMIC Fa0/3

1 0060.7020.0505 DYNAMIC Fa0/5

1 0090.2b15.c5cd DYNAMIC Fa0/8


(Our switch dynamically learns and store the MAC entries)


Switch(config)#mac address-table static 0030.f2d1.9701 vlan 1 interface fastEthernet 0/1

Switch(config)#

Switch(config)#mac address-table static 0004.9A7B.331D vlan 1 interface fastEthernet 0/2

Switch(config)#

Switch(config)#mac address-table static 0060.3E6E.6DD5 vlan 1 interface fastEthernet 0/3

Switch(config)#

Switch(config)#mac address-table static 000A.418D.0B8B vlan 1 interface fastEthernet 0/4

Switch(config)#

Switch(config)#mac address-table static 0060.7020.0505 vlan 1 interface fastEthernet 0/5

Switch(config)#

Switch(config)#mac address-table static 0010.1141.3D28 vlan 1 interface fastEthernet 0/6

Switch(config)#

Switch(config)#mac address-table static 0050.0F64.A758 vlan 1 interface fastEthernet 0/7

Switch(config)#

Switch(config)#mac address-table static 0090.2B15.C5CD vlan 1 interface fastEthernet 0/8

Switch(config)#

Switch(config)#mac address-table static 0001.C92E.016D vlan 1 interface fastEthernet 0/9

Switch(config)#

Switch(config)#mac address-table static 000D.BD40.3C82 vlan 1 interface fastEthernet 0/10

Switch(config)#end


Switch#show mac address-table static

Mac Address Table

-------------------------------------------


Vlan Mac Address Type Ports

---- ----------- -------- -----


1 0001.c92e.016d STATIC Fa0/9

1 0004.9a7b.331d STATIC Fa0/2

1 000a.418d.0b8b STATIC Fa0/4

1 000d.bd40.3c82 STATIC Fa0/10

1 0010.1141.3d28 STATIC Fa0/6

1 0030.f2d1.9701 STATIC Fa0/1

1 0050.0f64.a758 STATIC Fa0/7

1 0060.3e6e.6dd5 STATIC Fa0/3

1 0060.7020.0505 STATIC Fa0/5

1 0090.2b15.c5cd STATIC Fa0/8


Switch#show mac address-table

Mac Address Table

-------------------------------------------


Vlan Mac Address Type Ports

---- ----------- -------- -----


1 0001.c92e.016d STATIC Fa0/9

1 0004.9a7b.331d STATIC Fa0/2

1 000a.418d.0b8b STATIC Fa0/4

1 000d.bd40.3c82 STATIC Fa0/10

1 0010.1141.3d28 STATIC Fa0/6

1 0030.f2d1.9701 STATIC Fa0/1

1 0050.0f64.a758 STATIC Fa0/7

1 0060.3e6e.6dd5 STATIC Fa0/3

1 0060.7020.0505 STATIC Fa0/5

1 0090.2b15.c5cd STATIC Fa0/8


Thursday 22 December 2022

What is ASA Firewall Static NAT? How to configure Static Network Address Translation

 Static Network Address Translation


Static NAT –

This means a single private IP address (unregistered) is configured and mapped with the public IP address (registered) one-to-one mapped.

This is not for organizations because of many devices. We use this in web hosting or home networks.

In the previous blog, we have seen dynamic NAT where the inside network can access the outside but now the outside wants to reach our DMZ server. Let's see how to configure 

Topology:-


Goal:

  • configure the topology as per the diagram 
  • configure the IP addresses to their interfaces 
  • configure security zones and levels 
  • configure access lists 
  • configure Static NAT 
  • make sure PCs can reach servers 


INSIDE-ROUTER(config)#interface gigabitEthernet 0/0/1
INSIDE-ROUTER(config-if)#ip address 10.1.1.1 255.0.0.0
INSIDE-ROUTER(config-if)#no shutdown 
INSIDE-ROUTER(config-if)#exit

%LINK-5-CHANGED: Interface GigabitEthernet0/0/1, changed state to up
%LINEPROTO-5-UPDOWN: Line protocol on Interface GigabitEthernet0/0/1, changed state to up


DMZ-ROUTER(config)#interface gigabitEthernet 0/0/1
DMZ-ROUTER(config-if)#ip address 20.1.1.1 255.0.0.0
DMZ-ROUTER(config-if)#no shutdown 
DMZ-ROUTER(config-if)#exit

 
HANGED: Interface GigabitEthernet0/0/1, changed state to up
%LINEPROTO-5-UPDOWN: Line protocol on Interface GigabitEthernet0/0/1, changed state to up


DMZ-ROUTER(config)#interface gigabitEthernet 0/0/0
DMZ-ROUTER(config-if)#ip address 192.168.2.1 255.255.255.0
DMZ-ROUTER(config-if)#no shutdown 
DMZ-ROUTER(config-if)#exit

%LINK-5-CHANGED: Interface GigabitEthernet0/0/0, changed state to up


OUTSIDE-ROUTER(config)#interface gigabitEthernet 0/0/1
OUTSIDE-ROUTER(config-if)#ip address 30.1.1.1 255.0.0.0
OUTSIDE-ROUTER(config-if)#no shutdown 
OUTSIDE-ROUTER(config-if)#exit

%LINK-5-CHANGED: Interface GigabitEthernet0/0/1, changed state to up
%LINEPROTO-5-UPDOWN: Line protocol on Interface GigabitEthernet0/0/1, changed state to up


CISCO-ASA(config)#interface gigabitEthernet 1/1
CISCO-ASA(config-if)#ip address 192.168.1.2 255.255.255.0
CISCO-ASA(config-if)#no shutdown 
CISCO-ASA(config-if)#nameif inside 
CISCO-ASA(config-if)#security-level 100
CISCO-ASA(config-if)#exit

CISCO-ASA(config)#interface gigabitEthernet 1/3
CISCO-ASA(config-if)#ip address 192.168.2.2 255.255.255.0
CISCO-ASA(config-if)#no shutdown 
CISCO-ASA(config-if)#nameif dmz

INFO: Security level for "dmz" set to 0 by default.

CISCO-ASA(config-if)#security-level 50
CISCO-ASA(config-if)#exit

CISCO-ASA(config)#interface gigabitEthernet 1/2
CISCO-ASA(config-if)#ip address 192.168.3.2 255.255.255.0
CISCO-ASA(config-if)#no shutdown 
CISCO-ASA(config-if)#nameif outside
CISCO-ASA(config-if)#security-level 0
CISCO-ASA(config-if)#exit


INSIDE-ROUTER(config)#ip route 0.0.0.0 0.0.0.0 192.168.1.2
INSIDE-ROUTER(config)#exit

DMZ-ROUTER(config)#ip route 0.0.0.0 0.0.0.0 192.168.2.2 
DMZ-ROUTER(config)#exit

OUTSIDE-ROUTER(config)#ip route 0.0.0.0 0.0.0.0 192.168.3.2
OUTSIDE-ROUTER(config)#exit

CISCO-ASA(config)#route inside 192.168.1.0 255.255.255.0 192.168.1.1

CISCO-ASA(config)#route dmz 192.168.2.0 255.255.255.0 192.168.2.1

CISCO-ASA(config)#route dmz 192.168.3.0 255.255.255.0 192.168.3.1

CISCO-ASA(config)#route inside 10.0.0.0 255.0.0.0 192.168.1.1

CISCO-ASA(config)#route inside 20.0.0.0 255.0.0.0 192.168.2.1

CISCO-ASA(config)#route inside 30.0.0.0 255.0.0.0 192.168.3.1

CISCO-ASA(config)#exit


CISCO-ASA(config)#access-list traffic_outside permit icmp any any 
CISCO-ASA(config)#access-list traffic_dmz permit icmp any any 

CISCO-ASA(config)#access-group traffic_outside in interface outside
CISCO-ASA(config)#access-group traffic_dmz in interface dmz

CISCO-ASA(config)#object network inside-outside-nat
CISCO-ASA(config-network-object)#host 192.168.1.1
CISCO-ASA(config-network-object)#nat (inside,outside) static 110.1.1.1
CISCO-ASA(config-network-object)#exit

CISCO-ASA(config)#object network dmz-outside-nat
CISCO-ASA(config-network-object)#host 192.168.2.1
CISCO-ASA(config-network-object)#nat (dmz,outside) static 111.1.1.1
CISCO-ASA(config-network-object)#exit


CISCO-ASA#show nat

Auto NAT Policies (Section 2)

1 (dmz) to (outside) source static dmz-outside-nat 111.1.1.1

translate_hits = 0, untranslate_hits = 0

2 (inside) to (outside) source static inside-outside-nat 110.1.1.1

translate_hits = 0, untranslate_hits = 0


{ ping PC 0 to PC 2 (inside to outside) }


{ ping PC 1 to PC 2 (DMZ to OUTSIDE)}


{Now ping from PC 2 to SERVER (OUTSIDE to DMZ)}


Sunday 18 December 2022

How to configure ASA Firewall Dynamic NAT?

 Network address translation

NAT is the method of translation of a private IP address into a public IP address. In order to communicate with the internet, we must have a registered public IP address.


Address translation was originally developed to solve two problems:

To handle a shortage of IPv6 addresses

 Hide network addressing schemes.

Types of NAT: -Static NAT

Dynamic NAT

Port Address Translation (PAT)


Static NAT- one-to-one mapping was done manually for every private IP needed on registered IP address (one-to-one)


Dynamic NAT- one-to-one mapping is done automatically for every private IP that needs one registered IP address (one-to-one)


Port address translation (Dynamic NAT Overload)- Allows thousands of users to connect to the internet using only one real global IP address. Maps many to one by using different ports. PAT is the real reason we haven’t run out of valid IP addresses on the internet.


Just like the Cisco IOS routers, we can configure NAT / PAT on our Cisco ASA firewall.


I'm assuming that you already know about NAT, if you don't, please click here 

let's configure dynamic NAT: -

Topology: -


Goal: -

  • configure topology as per the diagram 
  • configure an IP address on ISP router 
  • configure VLANs on ASA firewall
  • configure DHCP on the ASA firewall for inside 
  • configure a static route for VLAN 1 (inside)
  • configure on ASA Dynamic NAT for VLAN 1
  • make sure PC-A can ping web server 8.8.8.8


ISP-ROUTER(config)#interface gigabitEthernet 0/0
ISP-ROUTER(config-if)#ip address 192.168.1.1 255.255.255.0
ISP-ROUTER(config-if)#no shutdown 
ISP-ROUTER(config-if)#exit

ISP-ROUTER(config)#interface gigabitEthernet 0/1
ISP-ROUTER(config-if)#ip address 8.8.8.1 255.0.0.0
ISP-ROUTER(config-if)#no shutdown 
ISP-ROUTER(config-if)#exit


ciscoasa(config)#interface vlan 1
ciscoasa(config-if)#ip address 10.1.1.1 255.0.0.0
ciscoasa(config-if)#nameif inside
ciscoasa(config-if)#security-level 100
ciscoasa(config-if)#exit

ciscoasa(config)#interface ethernet 0/2
ciscoasa(config-if)#switchport access vlan 1
ciscoasa(config-if)#exit

ciscoasa(config)#interface vlan 2
ciscoasa(config-if)#ip address 192.168.1.2 255.255.255.0
ciscoasa(config-if)#nameif outside
ciscoasa(config-if)#security-level 0
ciscoasa(config-if)#no shutdown
ciscoasa(config-if)#exit

ciscoasa(config)#interface vlan 3
ciscoasa(config-if)#no forward interface vlan 1
ciscoasa(config-if)#ip address 20.1.1.1 255.0.0.0
ciscoasa(config-if)#nameif dmz

INFO: Security level for "dmz" set to 0 by default.

ciscoasa(config-if)#security-level 50
ciscoasa(config-if)#exit

ciscoasa(config)#interface ethernet 0/1
ciscoasa(config-if)#switchport access vlan 3
ciscoasa(config-if)#end

ciscoasa#show interface ip brief 
Interface              IP-Address      OK? Method Status                Protocol
 
Vlan1                  10.1.1.1        YES manual up                    up
 
Vlan2                  192.168.1.2     YES manual up                    up
 
Vlan3                  20.1.1.1        YES manual up                    up


ciscoasa#show ip address 
System IP Addresses:
Interface             Name                 IP address      Subnet mask     Method
Vlan1                 inside               10.1.1.1        255.0.0.0       manual
Vlan2                 outside              192.168.1.2     255.255.255.0   manual
Vlan3                 dmz                  20.1.1.1        255.0.0.0       manual

Current IP Addresses:
Interface             Name                 IP address      Subnet mask     Method
Vlan1                 inside               10.1.1.1        255.0.0.0       manual
Vlan2                 outside              192.168.1.2     255.255.255.0   manual
Vlan3                 dmz                  20.1.1.1        255.0.0.0       manual


ciscoasa#show switch vlan

VLAN Name                             Status    Ports
---- -------------------------------- --------- -------------------------------
1    inside                           up        Et0/2, Et0/3, Et0/4, Et0/5
                                                Et0/6, Et0/7
2    outside                          up        Et0/0
3    dmz                              up        Et0/1


ciscoasa(config)#dhcpd address 10.1.1.5-10.1.1.15 inside
ciscoasa(config)#dhcpd dns 8.8.8.8 interface inside
ciscoasa(config)#dhcpd enable inside


(Verify PC-A-B-C is getting IP configuration from DHCP ASA firewall)

PC-A


PC-A


PC-A


ciscoasa(config)#route outside 0.0.0.0 0.0.0.0 192.168.1.1


ciscoasa(config)#object network inside
ciscoasa(config-network-object)#subnet 10.0.0.0 255.0.0.0
ciscoasa(config-network-object)#nat (inside,outside) dynamic interface
ciscoasa(config-network-object)#exit


ciscoasa(config)#access-list ASA extended permit tcp any any
ciscoasa(config)#access-list ASA extended permit icmp any any
ciscoasa(config)#access-group ASA in interface outside


Wednesday 14 December 2022

What are the basics of ethical hacking?

 Ethical Hacking (basic)


White-hat hackers are also known as ethical hackers and they are professionals with expertise in cybersecurity. They are authorized by the company and certified to hack the systems. They hack systems from the loop to find weaknesses in the system. They never intend to harm the system, rather than try to find out weaknesses in a computer or a network system as a part of penetration testing and vulnerability assessments. well, Ethical hacking is not illegal actually it is one of the most demanding jobs available in the IT Industry. many companies hire ethical hackers for penetration testing and vulnerability assessments. ethical hackers' job is to protect the system network from hackers.


What is hacking?

Hacking is the act of finding the possible entry points that exist in a computer system or computer network and finally entering into them. hacking is usually done to gain unauthorized access to a computer system or a computer network, either to harm the system or to steal sensitive information available on the computer. Hacking is not always a malicious activity, but the term has mostly negative connotations due to its association with cybercrime. hacking is usually legal as long as it is being done to find weaknesses in a computer or network system for testing purposes. 

Types of hacking (BASIC)

we can segregate hacking into different categories, based on what is being hacked. 

here is a set of basic hacking examples: 


Social engineering

Social engineering is a manipulation technique. Using a fake identity and various psychological tricks, hackers can deceive you into disclosing personal or financial information. They rely on phishing scams, spam emails or instant messages, or even fake websites to achieve hacking.


Hacking passwords

Hackers use many ways to gain passwords. The trial-and-error method in which involves hackers trying to guess every possible combination to obtain access. Hackers also use simple algorithms to generate different combinations for letters, numbers, and symbols to help them identify password combinations. Another technique is known as a dictionary attack, which is a program that inserts common words into password fields to see if one works.


 Malware hacking

Hackers infiltrate a user’s device to install malware. More likely, hackers will target potential victims via email, instant messages, and websites with downloadable content or peer-to-peer networks.


Wireless Networks Hacking

hackers just simply take advantage of open wireless networks. Many people do not secure their Wi-Fi routers, and this can be exploited by hackers driving around looking for open and unsecured wireless connections. This is an activity known as wardriving. When hackers are connected to an unsecured network, they only need to bypass basic security to gain access to devices connected to that network.


Website hacking

Website hacking: hacking a website means taking unauthorized control over a web server and its associated software such as databases and other interfaces. 


Network hacking

Network hacking a network means gathering information about a network by using tools like telnet, NS lookup, ping, tracert, netstat, etc. with the intent to harm the network system and hamper its operation. 


Email hacking

Email hacking includes getting unauthorized access to an email account and using it without taking the consent of its owner. 


The advantages of hacking 

are quite valuable for the following scenarios:

Whenever you need to recover lost information, especially in case you lost your password. 

When you want to perform penetration testing to strengthen computer and network security. 

when to put adequate preventative measures in place to prevent security breaches. 

to have a computer system that prevents malicious hackers from gaining access. 


The disadvantages of hacking 

are quite dangerous if it is done with harmful intent. it can cause: 

massive security breach. 

unauthorized system access to private information. 

privacy violation. 

hampering system operation.

denial of service attacks 

malicious attack on the system. 

purpose of hacking 

there could be various positive and negative intentions behind performing hacking activities, here is a list of some probable reasons why people indulge in hacking activities: 

just of fun 

show-off 

steal important information 

damaging the system 

hampering privacy 

money extortion 

system security testing 

to break policy compliance


What is Virtual Router Redundancy Protocol (VRRP)? How to configure Virtual Router Redundancy Protocol (VRRP)?

 Virtual Router Redundancy Protocol (VRRP) is a gateway redundancy networking protocol used to create a virtual gateway similar to HSRP . VR...